
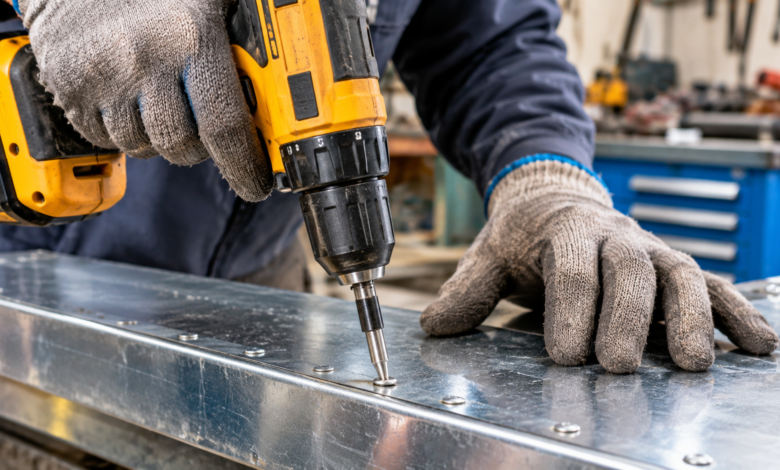
Rivet Removing Tool: Types, Uses and How to Remove Rivets Safely
A rivet is a permanent mechanical fastener used to join two or more pieces of material, often metal. Unlike a screw, a rivet cannot usually be unscrewed when a repair or replacement is needed. A rivet removing tool makes this task easier by helping remove the fastener while minimising damage to the surrounding surface.
These tools are useful for household repairs, metal fabrication, vehicle bodywork, furniture maintenance and workshop projects. The right choice depends on the type of rivet, the material being joined and whether the original hole needs to be reused.
This guide explains how a rivet removing tool works, which options are available, how to remove common blind rivets, and what safety precautions to follow. It also covers common mistakes and situations where specialist equipment or professional assistance is the better option.
What Is a Rivet Removing Tool?
A rivet removing tool is a hand-operated or powered device designed to separate a riveted joint by removing the fastener or its head. Depending on the design, it may use a drill bit, a guide collar, a punch or a dedicated mechanical removal mechanism.
The main purpose is to release the joined components without unnecessarily enlarging the hole or damaging the surrounding material.
Some tools are designed for ordinary aluminium blind rivets, commonly known as pop rivets. Others are intended for solid rivets, structural blind rivets or specific industrial fastening systems. These applications are not interchangeable, so identify the fastener before choosing a removal method.
A purpose-built rivet removing tool can be particularly helpful when accuracy matters, such as when replacing a fastener in a thin metal panel.
Types of Rivet Removing Tools
The best option depends on the fastener and the workpiece. There is no single tool that is ideal for every rivet removal job.
1. Drill-Based Rivet Removal Tool
A drill-based rivet removing tool uses a suitable drill bit, sometimes combined with a guide or depth-limiting collar. The guide helps centre the bit on the rivet head and can limit how far the bit penetrates.
This design is useful when removing multiple similar rivets or when preserving the original hole is important. Some specialist models include interchangeable drill bits and guides for different rivet sizes.
2. Standard Electric Drill
A conventional electric drill can remove many ordinary blind rivets when fitted with an appropriately sized metal drill bit. It is often a practical option for occasional household repairs.
However, a standard drill does not automatically centre itself on the rivet head or prevent excessive drilling. The operator must maintain control and avoid cutting into the surrounding material.
For delicate panels or expensive components, a dedicated rivet removing tool with a suitable guide may offer better control.
3. Centre Punch and Pin Punch
A centre punch helps mark the centre of a rivet so the drill bit is less likely to wander. A pin punch can help push out a remaining rivet shank after the head has been removed.
These are supporting tools rather than complete removal systems. Choose sizes suitable for the fastener and workpiece.
4. Specialist Mechanical Removal Tool
Industrial applications may require dedicated equipment designed for particular rivet systems. Automotive structural rivets, aircraft fasteners and other high-strength joints can have specific removal requirements.
A general-purpose rivet removing tool should not be assumed suitable for structural fasteners. Follow the component manufacturer’s repair instructions or consult a qualified technician.
How to Use a Rivet Removing Tool
Removing an ordinary blind rivet is usually straightforward when the fastener and material are correctly identified. The following general procedure applies to suitable, non-structural blind rivets; specialist fasteners may require a different method.
Step 1: Identify the Rivet
First, establish whether the fastener is a blind rivet, solid rivet or another type. Check its head shape, approximate diameter, material and accessibility.
Blind rivets can generally be removed from one side, which makes them useful for enclosed or difficult-to-reach joints. Solid and structural rivets may require different procedures.
If the fastener is part of a load-bearing structure, vehicle safety system or aircraft component, stop and consult the relevant repair guidance rather than relying on a general DIY method.
Step 2: Secure the Workpiece
Make sure the item cannot move, rotate or vibrate unexpectedly. Use an appropriate vice, clamp or fixture without crushing or deforming thin material.
Remove nearby objects that could obstruct the drill. Confirm that there are no concealed cables, pipes or other components behind the rivet.
Wear suitable eye protection to guard against metal chips. Secure loose clothing and long hair, and follow the drill manufacturer’s safety instructions.
Step 3: Select the Correct Drill Bit
Choose a bit suitable for the rivet material, diameter and removal method. The aim is to remove the rivet head without enlarging the hole in the underlying material.
Do not automatically choose a bit based on the width of the rivet head. The head is usually wider than the body passing through the joined components.
If the fastener specification provides a removal procedure or drill size, use that information rather than guessing.
Step 4: Centre the Drill
Position the drill bit accurately on the rivet head. A centre punch or the guide supplied with a suitable rivet removing tool can help keep the bit aligned.
Hold the drill square to the work surface where the fastener design permits. An angled approach can damage the hole or the surrounding finish.
Step 5: Remove the Rivet Head Carefully
Drill with controlled pressure and keep the bit aligned. The aim is to separate the head from the rivet body, not to drill unnecessarily deep into the panel.
Stop once the head has separated. Excessive pressure can break the drill bit, damage the workpiece or cause the rivet body to spin.
If the rivet rotates, the bit wanders or the material begins to deform, stop and reassess the method.
Step 6: Remove the Remaining Rivet Body
After the head is removed, the remaining shank may need to be pushed out using an appropriately sized punch. Support the workpiece so the force does not bend or dent it.
Do not use excessive force if the shank will not move. A jammed or distorted rivet may require a different removal method.
Manufacturer guidance from GESIPA also emphasises securing the workpiece and accurately marking the centre when removing blind rivets.
Step 7: Inspect the Hole
Once the fastener has been removed, inspect the hole and surrounding material for burrs, deformation, cracks or other damage.
Clean away metal chips safely. If the hole has become oversized or distorted, the original fastener may no longer be suitable. The replacement may need to be selected according to the component’s repair requirements.
How to Choose the Right Rivet Removing Tool
Before purchasing a rivet removing tool, consider these factors.
| Feature | What to check |
|---|---|
| Rivet compatibility | Whether the tool supports the specific rivet type |
| Size range | Compatible diameters and available drill guides |
| Depth control | Whether the design helps prevent drilling too deeply |
| Material compatibility | Suitability for aluminium, steel or other fasteners |
| Access | Whether the tool fits the available working space |
| Replacement parts | Availability of compatible bits and guides |
| Ease of use | Clear instructions and a comfortable, controllable design |
For occasional household maintenance, a standard drill and suitable accessories may be sufficient. If you regularly remove rivets or need to preserve holes accurately, a dedicated rivet removing tool may be a more practical investment.
For specialist structural work, compatibility and approved procedures matter more than convenience.
Common Rivet Removal Mistakes to Avoid
Even a suitable tool can damage a workpiece when used incorrectly.
-
Using the wrong drill bit: An unsuitable size can leave the rivet partly attached or enlarge the hole.
-
Drilling at an angle: Poor alignment can damage the panel and make replacement difficult.
-
Applying excessive pressure: Forcing the drill increases the risk of broken bits and damaged material.
-
Ignoring the rivet type: Structural and solid rivets may need specialised removal procedures.
-
Failing to secure the workpiece: Movement can cause the bit to slip or the material to deform.
-
Skipping the final inspection: A damaged hole may not hold a replacement rivet securely.
A rivet removing tool should make the removal process more controlled, not encourage rushing through it.
Safety Tips for Removing Rivets
Drilling metal creates sharp chips that can injure eyes and skin. Wear suitable eye protection and any additional protective equipment required by the tool manufacturer and workplace assessment.
Secure the component before drilling, keep hands away from the rotating bit, and disconnect the drill from its power source before changing accessories. Never hold a small, loose metal component in your hand while drilling it.
If the work involves a vehicle, pressure vessel, aircraft component or load-bearing structure, use the appropriate technical repair instructions. Incorrect removal can compromise the integrity of the assembly even when the surface looks undamaged.
Stop if the fastener is difficult to identify, the material begins to crack, or the removal process requires force beyond what the tool instructions recommend.
Conclusion
A suitable rivet removing tool can make fastener removal more accurate and help protect the surrounding material. The best choice depends on the rivet type, its size, the material being joined and whether the original hole must be preserved.
For routine DIY work, identify the fastener, secure the workpiece, choose compatible tools and remove the rivet carefully. For structural or safety-critical applications, follow approved repair instructions rather than relying on a general-purpose removal method.
(FAQs)
What is the best tool for removing rivets?
For ordinary blind rivets, a suitable drill and metal drill bit are often sufficient. A dedicated rivet removing tool with a guide or depth stop can provide better control when preserving the surrounding material is important.
Can I remove a rivet without a drill?
Some rivets can be removed using appropriate hand tools, such as a punch and hammer, depending on the fastener and assembly. However, these methods can damage the workpiece if used incorrectly. Follow the appropriate removal instructions.
Can a rivet removing tool be used on steel rivets?
Some tools support steel rivets, but compatibility depends on the rivet’s material, hardness, size and design. Check the tool specifications before use, especially for hardened or structural fasteners.
Will removing a rivet damage the original hole?
It does not always damage the hole. Accurate alignment and the correct removal method help minimise damage. Drilling too deeply or using an unsuitable bit can enlarge or deform the hole.
Can I reuse a rivet after removing it?
Most removed blind rivets should not be reused. They are designed to form a permanent joint during installation, and removal typically damages the fastener. Use a suitable replacement rivet that meets the assembly’s requirements.
Do I need a professional to remove rivets?
Not necessarily. Many ordinary household and workshop repairs can be handled with suitable tools and precautions. However, structural, safety-critical and specialist industrial applications should follow the manufacturer’s repair procedure and may require a qualified professional.



One Comment